A Beginner’s Guide to Projection Mapping and Audio-Driven Visuals
Transform your music and live shows with immersive visuals—learn how to start projection mapping and create audio-reactive art on any budget.
EXPLOREPROJECTION MAPPING
Servo Sapiens
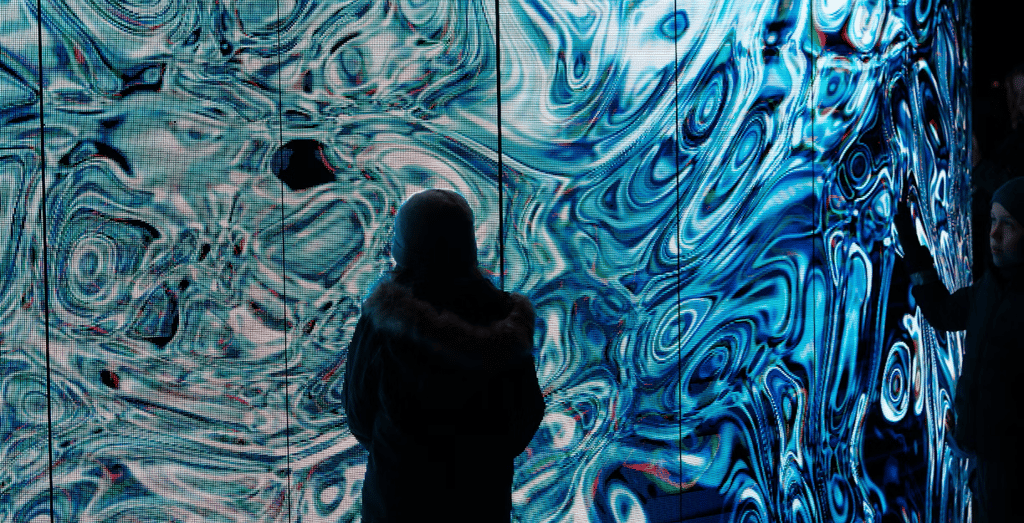
As an electronic music producer or aspiring VJ, you know how powerful music can be on its own. But imagine your tracks accompanied by visuals that move in perfect sync with every beat, bass drop, and melody. This is the magic of projection mapping and audio-driven visual art—two techniques that can elevate your performances and transform ordinary spaces into immersive experiences.
Whether you’re performing in small venues, streaming online, or just experimenting at home, you don’t need a massive budget or professional crew to start. Here’s how to bring your music to life visually.
What is Projection Mapping?
Projection mapping allows you to project visuals onto 3D surfaces—walls, buildings, stage props—rather than a flat screen. Specialized software lets you "map" the projected images so they fit perfectly, creating the illusion that the object itself is coming alive.
Why musicians and VJs love it:
It makes small venues feel epic with minimal equipment.
It turns any object (a speaker stack, DJ booth, or sculpture) into a visual centerpiece.
It’s dynamic and endlessly customizable to match your sound.
What is Audio-Driven Visual Art?
Audio-driven (or audio-reactive) visuals respond to the music in real time. They can flash, pulse, change color, or even morph based on different sound frequencies.
Why it’s impactful:
It keeps the visuals perfectly synced with your beats.
It creates a deeper emotional connection with the audience.
It works beautifully with both projection mapping and LED displays.
Essential Skills to Learn
Visual Design Basics:
Understand shapes, color, and rhythm in visuals.
Start with free tools like Canva or Blender for basic animations.
Projection Mapping Software:
MapMap (Free) – beginner-friendly and open-source.
HeavyM – simple and effect-packed.
MadMapper – professional standard, with a trial version available.
Audio-Reactive Tools:
Resolume Avenue/Arena – VJ software with powerful sound-driven effects.
TouchDesigner (Free non-commercial version) – great for generative and reactive art.
Basic Tech Knowledge:
Learn how projectors work (lumens, throw distance, resolution).
Understand how to run visuals from your laptop to projectors or LED walls.
What Gear Do You Need? (Beginner-Friendly)
A Laptop: Any mid-range laptop will work if it can handle video playback.
A Projector:
Start with a borrowed or used one. Aim for 3000+ lumens for indoor gigs.
Audio Input:
You can use your audio interface or even your laptop mic for basic audio-reactive effects.
Visual Content:
Download free video loops from Pixabay, Mixkit, or Beeple’s free VJ packs.
How to Start on a Small Budget
Practice at Home:
Map visuals onto cardboard boxes, furniture, or walls.
Use Free Software:
Combine MapMap (for mapping) and TouchDesigner (for audio-reactive visuals).
Experiment with Your Own Music:
Use your DAW’s audio output as the visual trigger.
Perform for Friends or Stream Online:
Gain experience before jumping into venues.
Free Learning Resources
YouTube: Channels like DocOptic, ENCORE, and Interactive & Immersive HQ have step-by-step tutorials.
Communities:
vjforums.com, Reddit’s r/VJing, Facebook groups like Projection Mapping Central. and Tweaxter.Net
TouchDesigner Tutorials: Free beginner workshops on their official website.
Why Musicians Should Learn VJ Skills
As an electronic music producer, adding visuals gives you a competitive edge:
Your live shows become memorable and unique.
You can control the entire audiovisual experience.
It opens doors for collaborations with other artists, brands, and venues.
Your First Steps Today
Download MapMap (free) or HeavyM trial and experiment with projection mapping.
Grab some free loops online and try mapping them to an object at home.
Explore audio-reactive effects in Resolume or TouchDesigner using one of your own tracks.
Don’t wait for a massive stage to start experimenting. With the right tools, you can create immersive visual art in your bedroom—and when the time comes to perform live, you’ll already have a killer setup.
© Servo Sapiens 2025. All rights reserved.